The No-Dig Miracle:
UV CIPP Pipe Lining is Saving
Tucson Yards (And Wallets!)
Let’s face it: nobody wakes up excited to deal with a broken sewer line. But if you’re reading this, you probably have a smelly, expensive problem on your hands. Don’t panic—put down the shovel. We’ve got a better way.
Year Design Life
UV Cure Per 5-Foot Section
Shovels Required
Satisfaction Guaranteed

Your Sewer Line is Trying to Tell You Something
Picture this: It’s a beautiful Tucson Saturday. You’re enjoying a cup of coffee on the patio, maybe watching a roadrunner zip through the yard. Then you hear it—a deep, ominous gurgle from inside the house. You investigate, and the smell hits you before you even open the bathroom door.
If your home was built before the 1980s, there’s a very good chance your sewer line is made of clay, cast iron, or the dreaded Orangeburg pipe—a wartime-era material made of compressed tar and wood pulp that literally softens and collapses over time. In Tucson, the combination of shifting caliche-rich desert soil, extreme temperature swings, and the relentless thirst of mesquite and palo verde tree roots creates a perfect storm for sewer line failure.
The Warning Signs (Don’t Ignore These)
- The Gurgle of Doom: Your toilets, sinks, or tubs are draining painfully slowly or making strange bubbling noises. This is your pipes crying for help.
- The Smell: A persistent, unmistakable odor of sewage in your yard, bathrooms, or near your foundation.
- The Root Invasion: You’ve had to call a plumber to snake or hydro-jet roots out of your line more than once this year. They keep coming back because the root entry points are still there.
- The Soggy Patch: An inexplicably wet or lush green patch in your yard that has nothing to do with your sprinklers. Spoiler: it’s sewage.
- The Dreaded Trench Quote: A plumber has already told you that you need to “dig it up” and the quote made you feel a little faint.
- The Repeat Clogs: No matter how many times you clear the line, the problem keeps coming back within weeks or months.
Here’s the hard truth: a failing sewer line is not a problem that fixes itself. Every day you wait, tree roots grow deeper into the cracks, pipe walls get weaker, and the risk of a full sewer backup increases dramatically. But here’s the good news: you absolutely do not have to dig it out as long as it isn’t as bad as the image bellow.
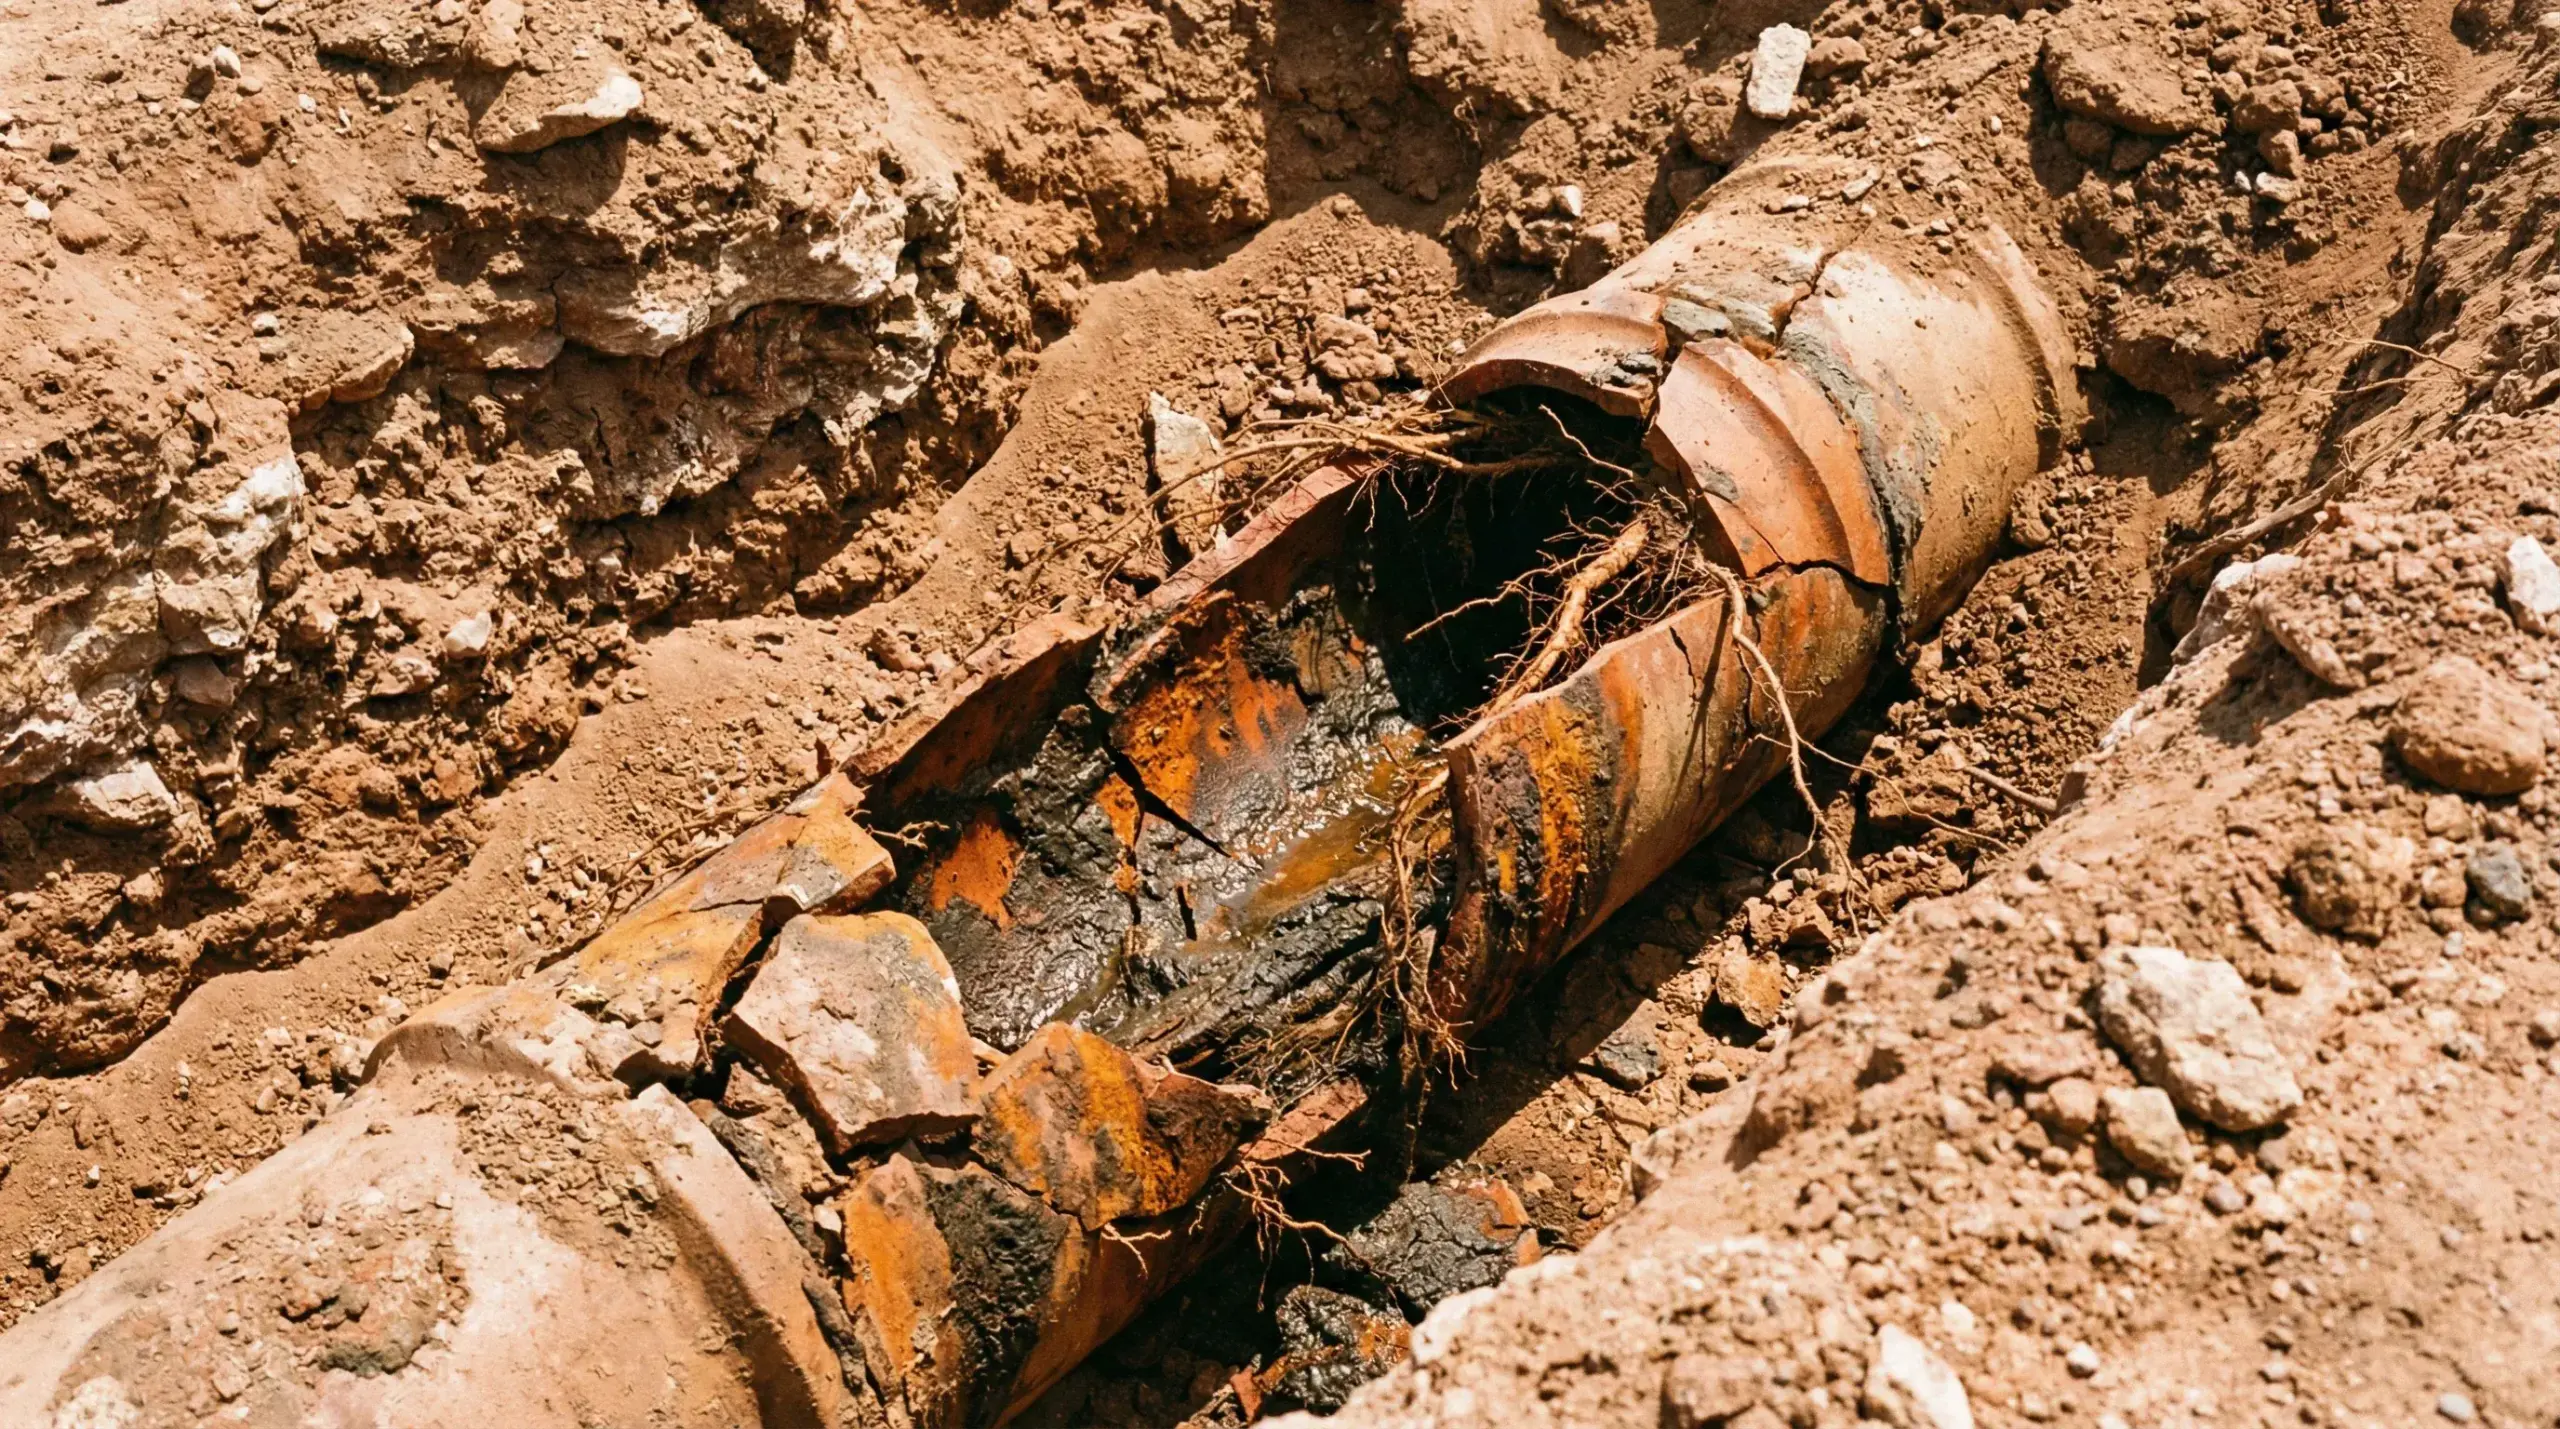
The nightmare scenario: A severely rotted clay sewer line in a Tucson trench, completely compromised by decades of corrosion and aggressive tree root intrusion. This is exactly what we fix—without touching your yard, before this scenario. If too much time has passed a section like this would have to be dug up and replaced.
So, What Exactly is UV CIPP Pipe Lining?
CIPP stands for Cured-In-Place Pipe. Think of it as a stent for your plumbing—or a full pipe transplant performed from the inside, with no surgery required.
According to peer-reviewed engineering research, the process involves inserting a flexible, resin-saturated liner into a damaged pipe. Once in place, the liner is cured to form a new, structurally independent pipe within the old host pipe [1]. The old pipe essentially becomes a mold for the brand-new one.
Traditional CIPP uses hot water or steam to cure the resin, which takes time and is sensitive to temperature. We use UV light. A UV light train is pulled through the liner, and the resin hardens in minutes. A 5-foot section cures in approximately one minute [2]. The result is a hard, seamless, joint-free pipe that’s stronger than what was there before.
The Science Behind the Magic
UV-cured CIPP uses a photoinitiator in the resin that reacts specifically to ultraviolet light wavelengths. When the UV train passes through, it triggers a rapid polymerization reaction, transforming the flexible resin into a rigid, glass-fiber-reinforced composite pipe. This process produces lower volatile organic compound (VOC) emissions than steam curing and delivers more consistent structural results across the entire liner length [2].
Why You’ll Love UV CIPP: The Benefits
Let’s talk about what you actually get when you choose trenchless UV CIPP pipe lining over the old-school dig-and-replace method.
The Big Wins
- Zero Digging Required: We access the pipe through an existing cleanout or a small access point. Your driveway, patio, landscaping, and that saguaro you’ve been growing for 20 years? All completely untouched.
- Lightning Fast: While traditional trenching can take 3–5 days (plus weeks of landscaping recovery), UV CIPP is typically completed in a single day. The UV curing process takes just minutes per section.
- Root-Proof & Seamless: The new liner has zero joints and zero seams. No joints means no entry points for moisture-seeking tree roots. Problem solved. Permanently.
- Built to Last a Lifetime: This isn’t a patch job. When designed and installed to ASTM F1216 standards, CIPP liners are engineered for a minimum 50-year service life. The material retains at least 50% of its initial flexural modulus over five decades of continuous use [3] [4].
- A Pipe Within a Pipe: The new liner is structurally independent and can bear full soil and traffic loads even if the original host pipe completely deteriorates [5]. It’s essentially a brand-new pipe.
- Saves You Real Money: When you factor in the cost of replacing your driveway, repairing your landscaping, and the labor of open-cut excavation, infrastructure studies consistently show that trenchless methods are substantially less expensive in total life-cycle costs [6].
- Environmentally Friendly: Less excavation means less soil disruption, less equipment fuel, and less construction waste. UV curing also produces fewer VOC emissions than steam-based methods [2].
Before & After: The Trenchless Transformation
Let’s put the two approaches side by side so you can see exactly what you’re choosing between.
- A backhoe arrives and destroys your front yard, driveway, and patio
- A second contractor quote just to repave the driveway
- No plumbing use for 3–5 days
- Your 20-year-old palo verde gets cut down because it’s in the way
- Weeks of landscaping recovery before your yard looks normal again
- Camera inspection diagnoses the exact problem, no guesswork
- Hydro-jetting cleans the line through a small access point
- Resin liner inserted and inflated against the pipe walls
- UV light cures the new pipe in minutes
- Your yard looks untouched. You’re back to normal the same day.
Same result—a fully repaired sewer line—but one method leaves your property looking like a war zone, and the other leaves it looking like we were never even there.
How It Works: Step-by-Step
Here is exactly how we restore your sewer line. Every job starts with the same first step, and the process that follows depends entirely on what the camera reveals. We don’t cut corners—and we don’t skip steps. Here’s the full, honest picture of what proper UV CIPP pipe rehabilitation actually looks like.
Why the Prep Work Matters as Much as the Liner
A UV CIPP liner is only as good as the surface it bonds to. Rushing past the preparation steps—or skipping them entirely—is the number one reason trenchless repairs fail prematurely. Our process is thorough because your 50-year guarantee depends on it.
Before anyone touches a tool, we send a high-definition push camera down the full length of the line. This is non-negotiable. The camera footage tells us everything: the exact location and severity of every crack, root intrusion, joint separation, offset, bellied section, and collapse. We show you the footage on-site so you can see exactly what we’re dealing with. This step determines the entire game plan—including whether any section of pipe needs to be physically replaced before lining can begin.
Here’s something most trenchless companies won’t tell you upfront: not every section of pipe can be lined. If the camera reveals a section that is completely collapsed, severely offset, or structurally compromised to the point where a liner cannot be properly inflated and bonded—like the pipe shown in the photo above—that section must be excavated and replaced with new pipe first.
This is not a failure of the trenchless process. It’s the honest, correct approach. We dig out only the damaged section, replace it with new pipe, and backfill and compact the trench. Once the structural integrity of that section is restored, the rest of the line—all the sections that can be lined—proceeds with the UV CIPP process. The result is a fully rehabilitated line with minimal excavation overall.
With the structural issues resolved, we run a high-pressure hydro-jet through the entire line. Water is propelled at up to 4,000 PSI through a specialized nozzle, blasting away decades of accumulated grease, sludge, mineral scale, and tree root material. This first pass clears the bulk of the debris and opens the line so we can see what we’re working with on the pipe walls. A clean pipe is the foundation of a successful liner installation.
Hydro-jetting cleans the pipe, but milling prepares it. We run a mechanical cutting head through the line to remove any remaining hardened scale, calcified mineral deposits, protruding root stubs, and rough pipe wall irregularities that the water jet alone cannot eliminate. Milling creates a uniform, slightly abraded interior surface—which is critical for the resin liner to achieve full adhesion and structural contact with the host pipe wall. Think of it like sanding wood before you apply a finish: the prep work is what makes the final product last.
After milling, we run the hydro-jet through the line a second time. This final flush removes all the debris, shavings, and particulate matter that the milling process dislodged from the pipe walls. The goal is a pipe interior that is completely clean, dry, and free of any loose material before the liner goes in. Introducing a liner into a pipe with residual debris is one of the most common causes of liner failure—this step ensures it doesn’t happen.
Now the pipe is ready. We insert the flexible, resin-saturated fiberglass liner into the host pipe and inflate it with air pressure so it presses tightly and uniformly against the interior walls. The liner conforms to bends, junctions, and varying pipe diameters, covering the entire prepared section in a single continuous piece with no joints or seams.
Once the liner is fully inflated and seated, we pull our UV light train through it at a controlled speed. The ultraviolet light triggers instant polymerization in the resin—transforming the flexible liner into a rigid, glass-fiber-reinforced composite pipe in approximately one minute per five-foot section [2]. The result is a structurally independent, seamless pipe rated for a minimum 50-year service life [3] [4], bonded firmly to the interior of the host pipe and capable of bearing full soil and traffic loads on its own [5].
Once the liner has fully cured, we run the camera through the line one final time. We inspect the entire length of the new pipe—checking for full wall contact, smooth bore, proper termination at both ends, and the absence of any wrinkles, voids, or delamination. We show you the before-and-after footage side by side. If it’s not perfect, we don’t leave. When the camera confirms a flawless result, the job is done—and your line is back in service.
The Bottom Line on Process
- Every job starts with a camera inspection—no exceptions.
- Sections that are too damaged to line are excavated and replaced first, minimizing the overall dig footprint.
- The dual hydro-jet and milling sequence ensures the liner bonds correctly and achieves its full design life.
- The UV curing process takes minutes per section—not hours or days.
- A final camera pass confirms the repair before we consider the job complete.
Real Tucson Homeowner Scenarios
We’ve seen it all. Here are a few real-world situations that UV CIPP has solved for Tucson homeowners just like you.
The Mesquite Monster
A homeowner in the Rincon Heights neighborhood had a beautiful old mesquite tree in their front yard. Every 18 months, they’d call a plumber to snake out the roots that had invaded their 1960s clay sewer line. Each visit cost $300–$500 and the problem always came back. After UV CIPP lining, the seamless new pipe eliminated every root entry point. No more annual snake visits. No more smell. The mesquite tree is still standing, and the sewer line is now permanently root-proof.
The Driveway Dilemma
A family in Oro Valley received a traditional sewer replacement quote: $14,000 for the pipe work, plus another $8,000 to repave the concrete driveway that ran directly over the line. Total: $22,000 and three weeks of construction chaos. Our UV CIPP solution accessed the pipe through a cleanout at the side of the house. The project was completed in one day, and the driveway never had a single crack made in it.
The Orangeburg Nightmare
A 1950s home in the Sam Hughes neighborhood had Orangeburg pipe—the soft, tar-based material common in post-WWII construction. Orangeburg doesn’t crack; it deforms, collapsing inward like a crushed paper towel tube. Two other companies said it had to be dug up. Technicians inserted a UV CIPP liner that not only sealed the deformed sections but created a structurally independent pipe that now holds its shape regardless of what the old Orangeburg does around it [5].
What Tucson Homeowners Are Saying
Don’t just take our word for it. Here’s what your neighbors have experienced.
I was quoted $18,000 to dig up my entire driveway and replace the sewer line. Tucson Handy Guys came out, did the UV lining in one day, and my driveway is completely untouched. I honestly couldn’t believe it. Best money I’ve ever spent on this house.
We had roots coming back every single year. After the UV lining, it’s been two years and not a single clog. The crew was professional, explained everything, and were done before lunch. Highly recommend.
I was skeptical that they could fix a 60-year-old clay pipe without digging. They showed me the camera footage before and after, and the difference was absolutely incredible. Smooth, seamless, brand new pipe. My yard is perfect.
Ready to Stop Digging & Start Living?
A failing sewer line won’t fix itself. Every day you wait, the roots grow deeper, the cracks get wider, and the risk of a full sewer backup grows. But fixing it doesn’t have to be a nightmare—or cost you your driveway.
Our licensed plumbers at Tucson Handy Guys serve Tucson, Oro Valley, Marana, Sahuarita, Green Valley, and all surrounding communities. Call today for a free camera inspection and no-obligation estimate. We’ll show you exactly what’s happening in your pipes, explain your options clearly, and give you a fair, honest price. No pressure. No surprises.
No digging. No mess. Just a 50-year guarantee and a yard that looks like we were never there.
Engineering References & Citations
- A Comparative Review of Trenchless Cured-in-Place Pipe (CIPP). Frontiers in Water, Vol. 4 (2022).
- Properties and structure of UV light cured CIPP composites. Key Engineering Materials, Vol. 898 (2021).
- CIPP Specification Guideline. National Association of Sewer Service Companies (NASSCO) (2023).
- Long-term properties of cured-in-place pipe liner material. ASCE Journal of Materials in Civil Engineering (2022).
- The mechanical properties of high strength reinforced CIPP liner composites. Water (MDPI) (2018).
- Cost of Underground Infrastructure Renewal: A Comparison of Open-Cut and Trenchless Methods. ASCE (2008).
Disclaimer: The technical specifications, lifespan estimates, and cost comparisons cited above are based on controlled engineering studies and industry standards (such as ASTM F1216). Actual repair costs, project timelines, and material availability for your specific property may vary due to current economic conditions, supply chain factors, and the unique structural condition of your existing plumbing system.